Explore 3 Layer Engineered Construction
Site Preparation
Below is a professionally structured installation procedure for Holzer Floor. The key message is that proper site preparation, moisture checks, installation planning, and material ordering must be completed before installing Holzer Floor.
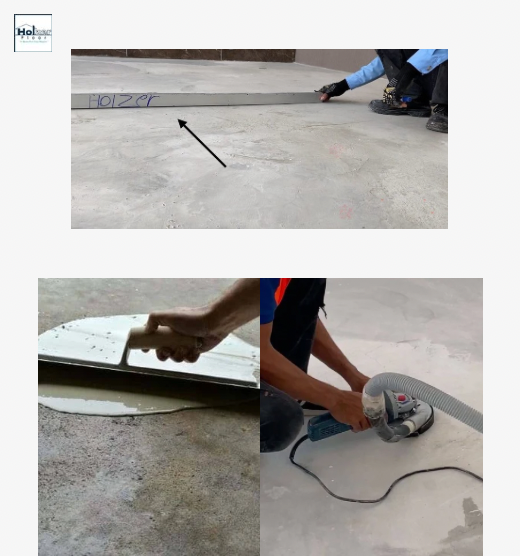
1. Check the Concrete Floor and Surface Level
Before installation, ensure the concrete floor is properly prepared, firm, clean, dry, and level according to Holzer Floor’s installation requirements.
● Check the floor level across the entire installation area.
● Repair uneven areas and remove loose material, dust, debris, and other surface contaminants before installation.
● Holzer Floor can be installed over existing tiles, provided the tiles are firmly bonded, stable, clean, dry, and sufficiently level.
● Repair loose, cracked, or hollow-sounding tiles and address uneven grout lines where necessary before installation.
Important The integrated underlay is designed to provide an underlay layer beneath the flooring. It cannot correct uneven concrete, level the floor, or compensate for significant surface defects. The subfloor must be properly prepared before installation.
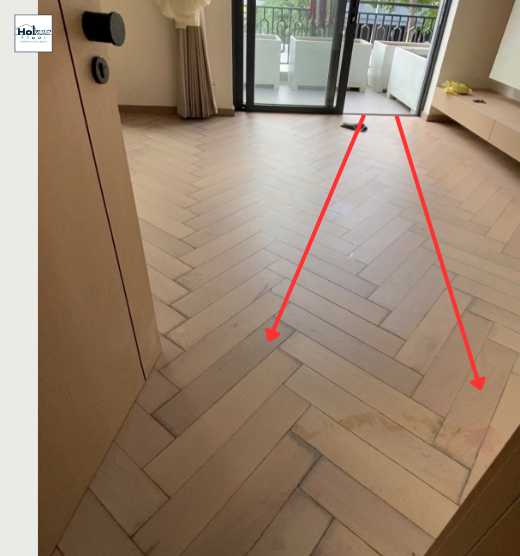
2. Inspect for Water Leakage and Moisture
Before installation, inspect the site for potential water leakage and moisture-related risks. This step is highly recommended, particularly in areas exposed to rainwater, plumbing leaks, or moisture penetration.
Pay particular attention to:
• Wall corners and external walls exposed to heavy rain.
• Bathrooms, toilets, and adjacent areas where water leakage may occur.
• Sliding doors, windows, and balcony entrances where rainwater may enter.
• Plumbing connections, concealed pipes, and other potential leakage points.
• Concrete floors that may retain moisture.
Recommended procedure:
1. Visually inspect the site for water stains, damp patches, cracks, and signs of previous leakage.
2. Use a suitable moisture meter to check the concrete floor and other relevant areas before installation.
3. Investigate any unusually high moisture readings and identify the source before proceeding.
4. Complete the necessary waterproofing and repair work in high-risk areas, including wall corners, external walls, wet areas, and door or window junctions.
5. Allow repaired and waterproofed areas to dry or cure fully, as required by the relevant product specifications.
6. Confirm that the site meets the applicable moisture requirements before installation.
Important: Waterproofing must address the actual source and path of water entry. A moisture meter reading alone does not confirm that an area is waterproof. Do not install flooring over an unresolved leak or a subfloor with moisture levels outside the permitted limits.

3. Complete Cabinets and Other Construction Work First
Holzer Floor is factory-finished. To minimise scratches, impact damage, stains, and unnecessary repair work, we highly recommend installing the flooring as late as practical in the construction process.
Where the project design allows, complete the following work first:
• Ceiling and overhead work.
• Wall painting and finishing.
• Cabinetry, built-in wardrobes, and fixed furniture.
• Other heavy construction and finishing work.
Install Holzer Floor after these activities have been completed and the site has been cleaned.
Recommended approach: Install the wood flooring as one of the final finishing stages to reduce the risk of damage caused by cabinet installation, painting, tools, ladders, and other trades.
If the project requires flooring to be installed before certain cabinets or fixed items, confirm the flooring layout, installation details, and relevant expansion requirements with the project team before work begins.
After installation, protect the finished floor appropriately if other trades must return to the site. Use clean, non-abrasive protective materials and avoid dragging heavy objects across the surface.
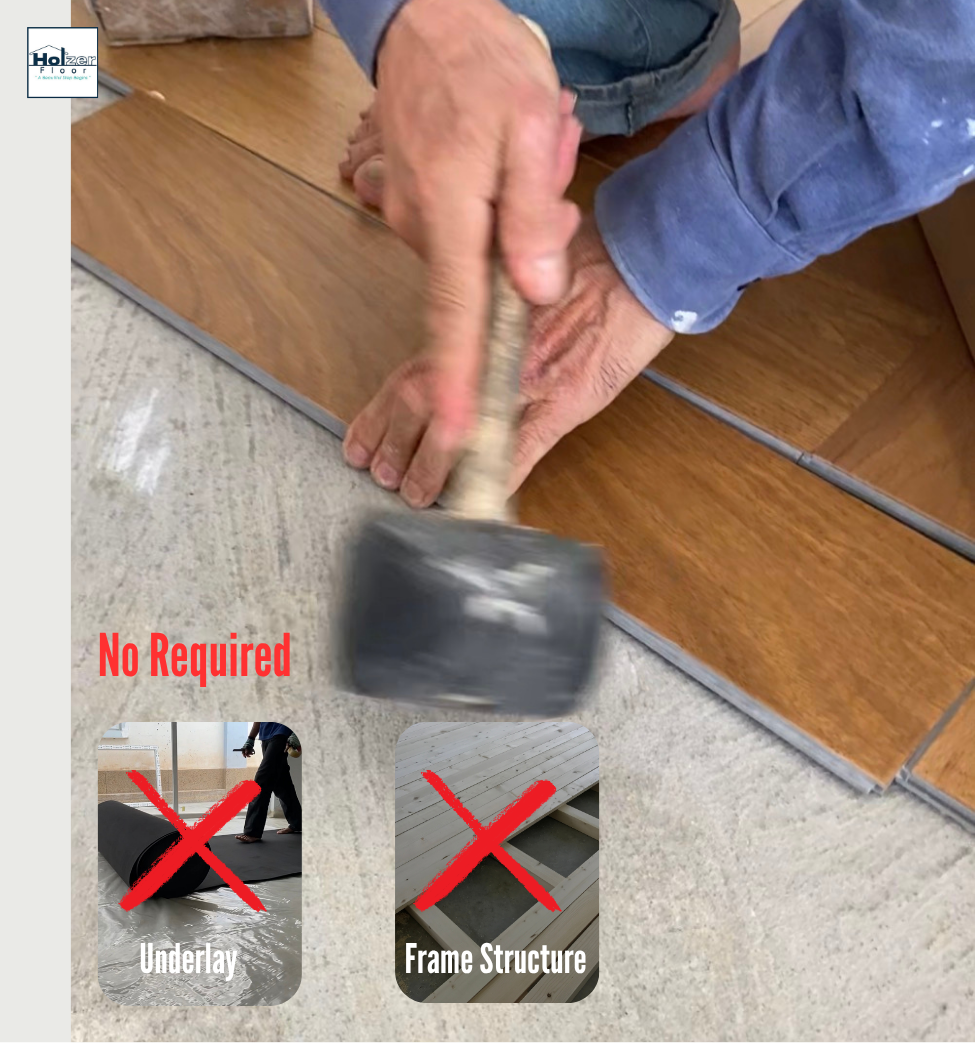
4. No Additional Underlay or Wooden Substructure Required
Holzer Floor Engineered Natural Oak Flooring features an integrated underlay supplied as part of the flooring construction.
• No separate underlay is normally required beneath the flooring.
• No additional wooden substructure is normally required for installation on a suitable, properly prepared subfloor.
• The flooring is designed to be installed over an appropriate prepared concrete floor or a suitable existing tiled surface.
Important: The integrated underlay does not level the subfloor or correct unevenness. Do not use additional underlay or a wooden substructure to compensate for an uneven surface unless the installation design has been specifically reviewed and approved.
Always follow the applicable Holzer Floor installation instructions and confirm that the proposed subfloor is suitable before installation.

5. Repair: Individual Planks Can Be Replaced
One advantage of a plank flooring system is that a damaged individual plank does not necessarily mean replacing the entire floor.
If one or a few pieces are seriously damaged, the affected plank can be removed and replaced by a trained installer.
Typical replacement process:
1. Identify the damaged plank.
2. Cut the plank carefully through the centre.
3. Remove the damaged sections without damaging the surrounding floor.
4. Clean the area and remove remaining material.
5. Prepare the replacement plank.
6. Remove the required tongue from the replacement piece where necessary.
7. Apply the appropriate flooring adhesive to the back.
8. Position the new piece carefully into the opening.
9. Allow the adhesive to cure according to the adhesive manufacturer’s instructions.
Important Plank replacement should be carried out by a qualified or experienced flooring installer, particularly when the floor has already been installed and surrounding planks must be protected.
6. Plan for Future Repair
Holzer Floor is made to order. We do not normally keep finished flooring in stock because each project is produced according to its selected colour, plank style and thickness.
For this reason, we strongly recommend planning for future repair during the original order.
Recommended additional quantity
Straight / Herringbone:
• Allow approximately 15–20% installation wastage, depending on the layout.
• Consider keeping an additional 5% for future replacement or repair.
Chevron:
• Allow approximately 20% installation wastage, depending on the layout.
• Consider keeping an additional 5% for future replacement or repair.
The exact quantity should be determined from the actual project layout and installation requirements.
Why keep extra flooring?
The color and natural character of oak may vary between production batches. Having the original flooring stored on site gives the best chance of obtaining a suitable match for future repairs.
For made-to-order natural oak flooring, keeping a small quantity from the original production is a practical form of future insurance.
7. Plan the Layout Before Ordering
For larger or more detailed projects, designers can use AutoCAD or another suitable drawing system to plan the floor layout before ordering.
The floor plan can help determine:
• Plank direction
• Starting point
• Room transitions
• Door and walkway alignment
• Pattern direction
• Estimated cutting and wastage
• Required flooring quantity
For example, the designer can lay out individual plank positions on the drawing to understand where the installation should begin and how the pattern will flow through the room.
This is particularly useful for Herringbone and Chevron, where the direction and starting point have a significant visual effect.
Recommended design process
1. Decide the plank direction
↓
2. Confirm the starting point
↓
3. Lay out the pattern digitally
↓
4. Calculate the required quantity and wastage
↓
5. Confirm the layout with the homeowner/client
↓
6. Finalise the order and installation plan
This can also help the project team coordinate the concrete levelling, ordering quantity and installation direction before work begins.
8. After Installation: Let the Floor Breathe
The first days after installation are important.
For approximately the first 7–10 days, allow the newly installed floor to settle under normal, well-ventilated indoor conditions.
Avoid:
• Sealing the room completely
• Covering the entire floor with plastic sheeting
• Trapping moisture beneath protective coverings
• Creating excessive heat inside the room
• Directing strong air-conditioning directly onto the floor
Plastic sheeting can trap moisture against the flooring and create a condensation or “sweating” effect.
Instead: Allow fresh air to circulate naturally and maintain a stable indoor environment.
9. Avoid Sudden Temperature Changes
Natural wood responds to its surrounding environment.
Avoid creating a strong temperature difference across the floor—for example, directing a powerful air-conditioner continuously at one section of the floor while the rest of the room remains much warmer.
Better practice
• Maintain a reasonably stable indoor temperature.
• Allow normal air circulation.
• Avoid direct, continuous cold airflow onto the floor.
• Avoid extreme heating or cooling.
• Keep the room ventilated during the initial period after installation.
Key takeaway
Natural wood performs best in a stable indoor environment rather than under sudden temperature or humidity changes.
10. Care & Maintenance for Designers
When specifying Holzer Floor, designers should consider more than just colour and appearance.
Specify and plan:
Before ordering
• Color
• Plank style
• Thickness
• Installation direction
• Layout
• Wastage
• Future replacement quantity
Before installation
• Subfloor level
• Subfloor moisture
• Site conditions
• Installation requirements
After installation
• Ventilation
• Moisture control
• Cleaning method
• Furniture protection
• Future repair requirements
⸻
Key Takeaway
Natural wood does not have to be difficult to maintain.
Holzer Floor combines a real natural oak surface with a dense stone core, factory-applied surface protection and an integrated underlay to create a practical flooring system for everyday spaces.
With proper subfloor preparation, moisture control, simple care and good planning for future replacement, designers can specify natural oak with greater confidence.
Related Topics
Stone-Core Technology
Why Holzer uses a dense stone-based core.
Integrated Underlay
1mm IXPE underlay, factory integrated and ready to install.
Surface Protection & Scratch Resistance
How the factory finishing process protects the natural oak surface.
Water & Moisture Considerations
What designers should check before installation.
Installation Instructions
The installation process and important site requirements.
